Making a Tail Sleeve
Download a PDF of these instructions
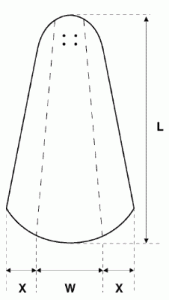 A simple tail sleeve such as the one illustrated in the diagram opposite, can help to prevent damage and soiling of important tail feathers when a bird is in the confinement of a hospital cage or transport box. This template can be adapted in size and, if possible, rehabilitators should have a selection made up in advance to cater for the species which they encounter most.
Make the tail sleeve from heavy duty plastic (old x-ray film is ideal). Mark out as shown, where “L” is the length of the tail, “W” is the width of the tail (in the closed position) and “X” is five eighths of W.
Fold along the dotted lines and punch four small holes in the top of the sleeve as shown. Place two small cable ties through the holes and partially close, leaving a loop on the underside of the sleeve.
Place the bird on its front and slide these loops over the two centre tail feathers until the sleeve is covering the full length of the tail – then close the cable ties.
Cut off the excess cable tie ends and fold the sleeve flaps to the underside of the tail. Turn the bird over, then seal and secure the joint of the tail sleeve using adhesive tape.
Ensure that the sleeve does not obstruct the bird’s vent. If the bird is moulting do not close the cable ties onto feathers which are still in blood. If necessary, the cable tie mounting holes can be set off centre to allow attachment to other tail feathers which are fully summed (not in blood).